I have a large dataset of head CTs I would like to normalize :
1/ Same size 512x512x40
2/ Same RAI Orientation
3/ Same centering
4/ Same head alignment
I have a head CT template that I could use to center and rotate my raw CTs, but not to resample because depth size is way too much (180) compared to my data (40). (registering to this template implies resampling to the same dimensions right ?)
I need some guidance on the steps I should follow, here is my plan : To solve 2/ : read image with sitk, SetDirection to RAI space
To solve 3/ and 4/ : I don’t see how I can use the template to align and center without having to resample the registered image to the template size, this is my first question.
Case A : My current guess is that I should manually rotate and translate a CT, resample it to 512x512x40 and use it as my fixed image ?
Is it really clean or is another solution favored ?
Case B: if I could possibly learn a rigid transform to translate and rotate will keeping the original dimension.
To solve 1/ : would be solved by resampling manually if case B. If case A, image is already at correct size.
This all seems pretty straightforward, but more difficult without practicing. There might be a simpler solution for all this, if so please tell me ^^
Registering does not imply resampling. Resampling is a separate step, to be done after registration if needed.
To achieve same RAI (more commonly known as LPS) orientation, you could apply OrientImageFilter. But if you will resample the image later, it is not needed.
If your template is of higher resolution than you want, you can downsample it to come up with common image grid (origin, size, spacing and orientation). You can come up with common image grid some other way - but if you do so, you will have to apply template’s transform to this grid to all the other images in addition to their registration transforms.
For all the images, register to template, than use the resulting registration transform to resample it to the common image grid.
Registering does not imply resampling. Resampling is a separate step, to be done after registration if needed.
Registering is the step of finding the optimal transformation and resampling is the step of applying it correct ?
Is there any difference between ITK’s OrientImageFilter and sitk SetDirection ?
If your template is of higher resolution than you want, you can downsample it to come up with common image grid (origin, size, spacing and orientation). You can come up with common image grid some other way - but if you do so, you will have to apply template’s transform to this grid to all the other images in addition to their registration transforms.
The depth resolution is higher, though the spatial resolution is two times lower. It seems risky to downsample one axis and upsample x,y agree ?
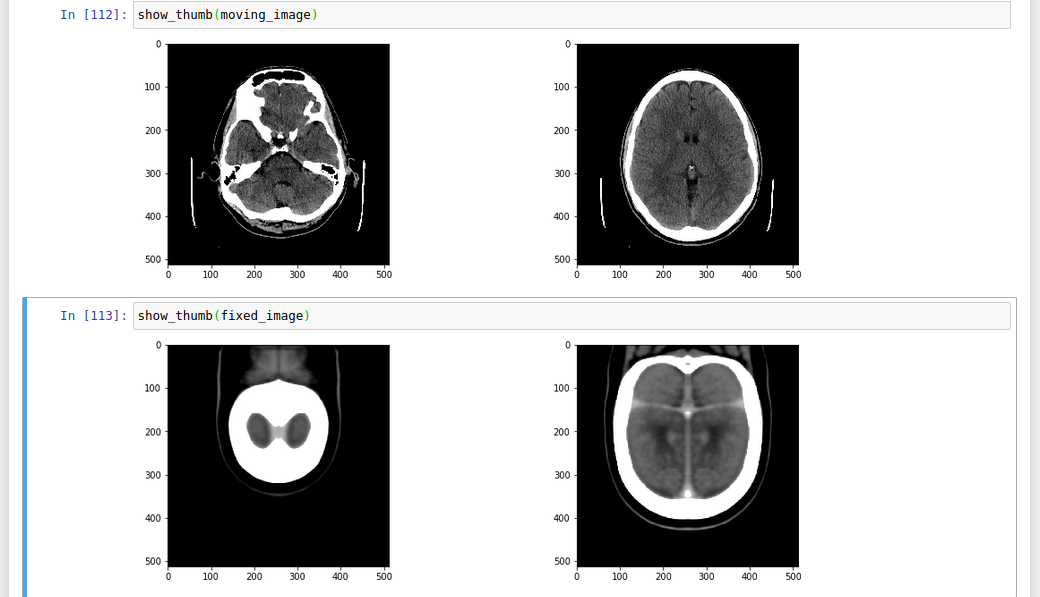
Moving image is (512, 512, 40) and fixed image is (181, 217, 181)
What’s your opinion ?
Side question : how is the fact that the axis are not ordered in the same way affecting the registration ? fine since the data is projected in the physical space ?
Yes. OrientImageFilter usually rearranges pixels in memory so they comply with the requested direction. SetDirection just changes direction without moving pixels around - the result is inversion of anatomical left-right or something similar.
You could choose some in-between resolution as the compromise. But you could totally go for the most common resolution, e.g. 512x512x40.
ITK is registering images in “physical space”, after all of those transformations are applied (spacing, orientation, origin). So different orientations are completely fine.
I am making progress, I decided to upsample my template to 512x512x40.
First workaround, is there a filter to resample each axis independently ? like a filter ? I have seen the example with the getInverse solution in the notebooks, but it seems to heavy just to upsample. There might be a simple filter to resample to a specific resolution right ?
For now I resampled with c3d, and here I am displaying images :
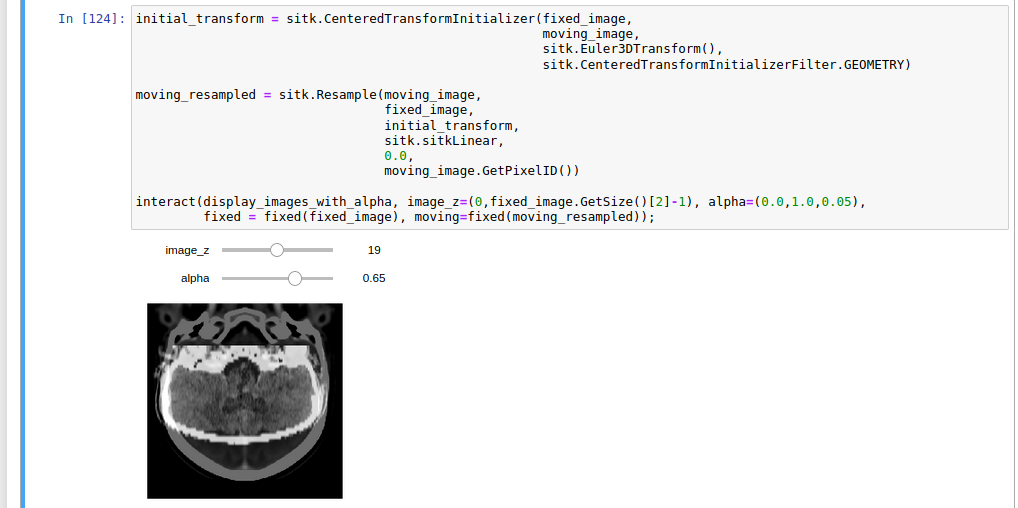
I don’t really get what’s wrong here, the spacing difference of x y axis between the two images is not that large, so why does the moving image seems to have a large spacing ?
0.48 is 37% bigger than 0.35. Common image grid includes the same spacing. So when resampling, you should also try to match the spacing.
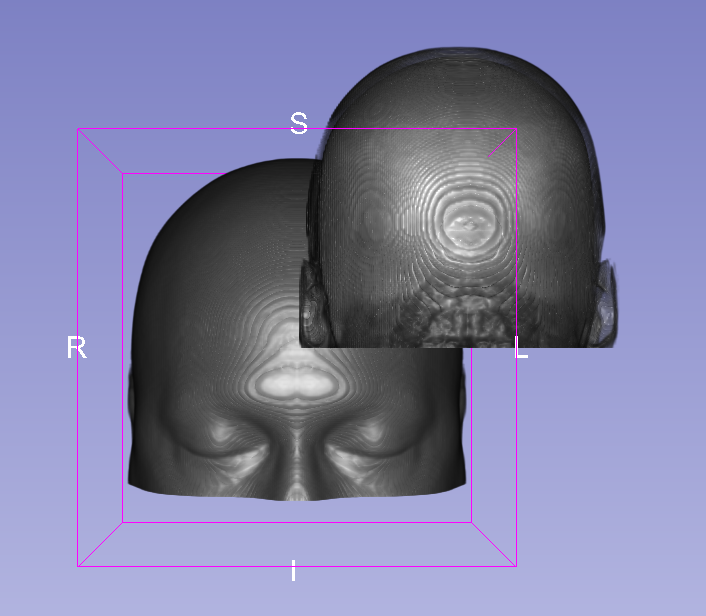
If you visualize your images using Slicer, you will see their positions, orientations and sizes in physical space. If you enable volume rendering, you can also see it in 3D. Then if you edit the metadata (origin, spacing) you will see how it affects the image’s physical appearance.
So basically I can’t have the depth size I want without trading the slice thickness, correct ?
In my case with a size of (512, 512, 40) and a spacing of 0.48, I will never be able to match a spacing of 0.35, correct ?
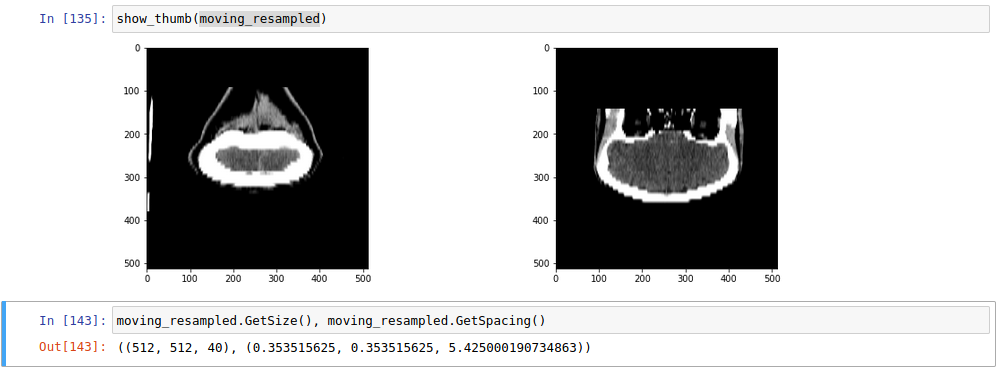
Here displaying the moving image and the resampled (same resolution and thickness, just for test) moving image. There might be something wrong in my resampling code, as you can see after transforming the patient gets rotated compared to the original. It’s weird since I am using the same rotation matrix…
def resize_image(img, im_size, spacing=None):
    dimension = img.GetDimension()

    if isinstance(im_size, int):
        im_size = [im_size]*dimension
    elif isinstance(im_size, list):
        assert(len(im_size) == dimension)

    # Create the reference image with a zero origin, identity direction cosine matrix and dimension
    reference_image = sitk.Image(im_size, img.GetPixelIDValue())
    reference_image.SetOrigin(np.zeros(dimension))
    reference_image.SetDirection(np.identity(dimension).flatten())

    if spacing is None:
        reference_physical_size = np.zeros(dimension)
        reference_physical_size[:] = [(sz-1)*spc if sz*spc>mx  else mx for sz,spc,mx in zip(img.GetSize(),
                                                                                            img.GetSpacing(),
                                                                                            reference_physical_size)]
        reference_spacing = [ phys_sz/(sz-1) for sz,phys_sz in zip(im_size, reference_physical_size) ]
        reference_image.SetSpacing(reference_spacing)
    else:
        reference_image.SetSpacing(spacing)

    # Transform which maps from the reference_image to the current img with the translation mapping the image
    # origins to each other.
    transform = sitk.AffineTransform(dimension)
    transform.SetMatrix(img.GetDirection())
    transform.SetTranslation(np.array(img.GetOrigin()) - np.zeros(dimension))

    # Always use the TransformContinuousIndexToPhysicalPoint to compute an indexed point's physical coordinates as
    # this takes into account size, spacing and direction cosines. For the vast majority of images the direction
    # cosines are the identity matrix, but when this isn't the case simply multiplying the central index by the
    # spacing will not yield the correct coordinates resulting in a long debugging session.
    reference_center = np.array(reference_image.TransformContinuousIndexToPhysicalPoint(np.array(reference_image.GetSize())/2.0))

    # Modify the transformation to align the centers of the original and reference image instead of their origins.
    centering_transform = sitk.TranslationTransform(dimension)
    img_center = np.array(img.TransformContinuousIndexToPhysicalPoint(np.array(img.GetSize())/2.0))
    centering_transform.SetOffset(np.array(transform.GetInverse().TransformPoint(img_center) - reference_center))
    centered_transform = sitk.Transform(transform)
    centered_transform.AddTransform(centering_transform)

    # Using the linear interpolator as these are intensity images, if there is a need to resample a ground truth
    # segmentation then the segmentation image should be resampled using the NearestNeighbor interpolator so that
    # no new labels are introduced.
    return sitk.Resample(img, reference_image, centered_transform, sitk.sitkLinear, 0.0)
The transformation seems to be mapping in a wrong way. Here is the updated code
def resize_image(img, img_size, spacing=None):
    dimension = img.GetDimension()

    if isinstance(img_size, int):
        img_size = [img_size]*dimension
    elif isinstance(img_size, list):
        assert(len(img_size) == dimension)

    # Create the reference image with a zero origin, identity direction cosine matrix and dimension
    reference_image = sitk.Image(img_size, img.GetPixelIDValue())
    reference_image.SetOrigin(img.GetOrigin())
    reference_image.SetDirection(img.GetDirection())

    if spacing is None:
        reference_physical_size = np.zeros(dimension)
        reference_physical_size[:] = [(sz-1)*spc if sz*spc>mx  else mx for sz,spc,mx in zip(img.GetSize(), img.GetSpacing(), reference_physical_size)]
        reference_spacing = [ phys_sz/(sz-1) for sz,phys_sz in zip(img_size, reference_physical_size) ]
        reference_image.SetSpacing(reference_spacing)
    else:
        reference_image.SetSpacing(spacing)

    # Transform which maps from the reference_image to the current img
    # with the translation mapping the image origins to each other.
    transform = sitk.AffineTransform(dimension)
    transform.SetMatrix(np.identity(dimension).flatten())
    transform.SetTranslation(np.zeros(dimension))

    reference_center = np.array(reference_image.TransformContinuousIndexToPhysicalPoint(np.array(reference_image.GetSize())/2.0))

    # Modify the transformation to align the centers of the original and reference image instead of their origins.
    centering_transform = sitk.TranslationTransform(dimension)
    img_center = np.array(img.TransformContinuousIndexToPhysicalPoint(np.array(img.GetSize())/2.0))
    centering_transform.SetOffset(np.array(transform.GetInverse().TransformPoint(img_center) - reference_center))
    centered_transform = sitk.Transform(transform)
    centered_transform.AddTransform(centering_transform)

    return sitk.Resample(img, reference_image, centered_transform, sitk.sitkLinear, 0.0)
You are taking direction from the current image. The direction needs to be same for all images. Since you want “normalization”, you could set the direction to identity for all images. That way you would not need to handle your reference image in a special way.