# Node Emscripten for watershed segmentation, unexpected pixel type
**URL:** https://discourse.itk.org/t/node-emscripten-for-watershed-segmentation-unexpected-pixel-type/5915
**Category:** Engineering
**Tags:** itk-wasm
**Created:** [May 1, 2023, 7:25pm UTC](https://discourse.itk.org/t/node-emscripten-for-watershed-segmentation-unexpected-pixel-type/5915 "2023-05-01T19:25:30Z")
**Posts on this page:** 2
**Page:** 1
### Author:  [@sag](https://discourse.itk.org/u/sag)
#### Post date: [May 1, 2023, 7:25pm UTC](https://discourse.itk.org/t/node-emscripten-for-watershed-segmentation-unexpected-pixel-type/5915/1 "2023-05-01T19:25:30Z")
@matt.mccormick
Hi,
I have following cxx code which does watershed segmentation, wasi is working now, but the node, inspect debugging, etc. not working, I have build node-emscripten debug, and node-inspect, node-emscripten-debug.
code \>\>
```auto
// Software Guide : BeginCommandLineArgs
// INPUTS: {VisibleWomanEyeSlice.png}
// OUTPUTS: {WatershedSegmentation1Output1.png}
// ARGUMENTS: 2 10 0 0.05 1
// Software Guide : EndCommandLineArgs
// Software Guide : BeginCommandLineArgs
// INPUTS: {VisibleWomanEyeSlice.png}
// OUTPUTS: {WatershedSegmentation1Output2.png}
// ARGUMENTS: 2 10 0.001 0.15 0
// Software Guide : EndCommandLineArgs
// Software Guide : BeginLatex
//
// The following example illustrates how to preprocess and segment images
// using the \doxygen{WatershedImageFilter}. Note that the care with which
// the data are preprocessed will greatly affect the quality of your result.
// Typically, the best results are obtained by preprocessing the original
// image with an edge-preserving diffusion filter, such as one of the
// anisotropic diffusion filters, or the bilateral image filter. As
// noted in Section~\ref{sec:AboutWatersheds}, the height function used as
// input should be created such that higher positive values correspond to
// object boundaries. A suitable height function for many applications can
// be generated as the gradient magnitude of the image to be segmented.
//
// The \doxygen{VectorGradientMagnitudeAnisotropicDiffusionImageFilter} class
// is used to smooth the image and the
// \doxygen{VectorGradientMagnitudeImageFilter} is used to generate the
// height function. We begin by including all preprocessing filter header
// files and the header file for the WatershedImageFilter. We
// use the vector versions of these filters because the input dataset is a
// color image.
//
//
// Software Guide : EndLatex
#include "itkPipeline.h"
#include "itkInputImage.h"
#include "itkOutputImage.h"
#include "itkRGBPixel.h"
#include "itkImage.h"
#include
// Software Guide : BeginCodeSnippet
#include "itkVectorGradientAnisotropicDiffusionImageFilter.h"
#include "itkVectorGradientMagnitudeImageFilter.h"
#include "itkWatershedImageFilter.h"
// Software Guide : EndCodeSnippet
#include "itkCastImageFilter.h"
#include "itkScalarToRGBPixelFunctor.h"
#include "itkMedianImageFilter.h"
namespace itk
{
/** \class myRGBPixel
* \brief Extends RGBPixel with operator <=
*
* This class overrides the <= and < operators to use Luminance as a sorting
* value.
*/
template
class myRGBPixel : public RGBPixel
{
public:
using Self = myRGBPixel;
using Superclass = RGBPixel;
using RGBPixel::operator=;
bool
operator<=(const Self & r) const
{
return (this->GetLuminance() <= r.GetLuminance());
}
bool
operator<(const Self & r) const
{
return (this->GetLuminance() < r.GetLuminance());
}
};
} // namespace itk
int main(int argc, char * argv[])
{
constexpr unsigned int Dimension = 2;
//sag i think 3D --- constexpr unsigned int VDimension = 3;
constexpr unsigned int VDimension = 3;
using MyPixelType = itk::myRGBPixel;
using MyImageType = itk::Image;
using RGBPixelType = itk::RGBPixel;
using RGBImageType = itk::Image;
using VectorPixelType = itk::Vector;
using VectorImageType = itk::Image;
using LabeledImageType = itk::Image;
using ScalarImageType = itk::Image;
using InputImageType = itk::wasm::InputImage;
using OutputImageType = itk::wasm::OutputImage;
//initialization of variables
unsigned int conductanceTerm = 2;
unsigned int diffusionIterations = 10;
double lowerThreshold = 0.0;
double outputScaleLevel = 0.05;
unsigned int gradientMode = 1;
itk::wasm::Pipeline pipeline("Segmentation-watershed", "Segment input image using Watershed method itk::wasm::pipeline", argc, argv);
//Add input image argument
InputImageType inputImage;
pipeline.add_option("InputImage", inputImage, "the input file name")->required()->type_name("INPUT_IMAGE");
//Add output image argument
OutputImageType outputImage;
pipeline.add_option("OuptputImage", outputImage, "the output file name")->required()->type_name("OUTPUT_IMAGE");
//Add conductanceTerm value argument
pipeline.add_option("-c,--conductanceTerm", conductanceTerm, "the conductanceTerm value");
//Add diffusion iterations value
pipeline.add_option("-d,--diffusionIterations", diffusionIterations, "the diffusionIterations value");
pipeline.add_option("-l,--lowerThreshold", lowerThreshold, "the lowerThreshold value");
//Add outputScaleLevel value
pipeline.add_option("-o,--outputScaleLevel", outputScaleLevel, "the outputScaleLevel value");
//Add gradientMode value
pipeline.add_option("-g,--gradientMode", gradientMode, "the gradientMode value");
//parse the pipeline input
ITK_WASM_PARSE(pipeline);
// Create and setup a median filter
using FilterType = itk::MedianImageFilter;
auto medianFilter = FilterType::New();
FilterType::InputSizeType radius;
medianFilter->SetRadius(0);
medianFilter->SetInput(inputImage.Get());
// Cast the custom myRBGPixel's to RGBPixel's
using CastType = itk::CastImageFilter;
auto cast = CastType::New();
cast->SetInput(inputImage.Get());
cast->Update();
// Software Guide : BeginCodeSnippet
//using FileReaderType = itk::ImageFileReader;
using CastFilterType = itk::CastImageFilter;
using DiffusionFilterType =
itk::VectorGradientAnisotropicDiffusionImageFilter;
using GradientMagnitudeFilterType =
itk::VectorGradientMagnitudeImageFilter;
using WatershedFilterType = itk::WatershedImageFilter;
// Software Guide : EndCodeSnippet
auto caster = CastFilterType::New();
// Software Guide : BeginLatex
//
// Next we instantiate the filters and set their parameters. The first
// step in the image processing pipeline is diffusion of the color input
// image using an anisotropic diffusion filter. For this class of filters,
// the CFL condition requires that the time step be no more than 0.25 for
// two-dimensional images, and no more than 0.125 for three-dimensional
// images. The number of iterations and the conductance term will be taken
// from the command line. See
// Section~\ref{sec:EdgePreservingSmoothingFilters} for more information on
// the ITK anisotropic diffusion filters.
//
// Software Guide : EndLatex
// Software Guide : BeginCodeSnippet
auto diffusion = DiffusionFilterType::New();
diffusion->SetNumberOfIterations(diffusionIterations);
diffusion->SetConductanceParameter(conductanceTerm);
diffusion->SetTimeStep(0.125);
// Software Guide : EndCodeSnippet
//sag check
// Software Guide : BeginLatex
//
// The ITK gradient magnitude filter for vector-valued images can optionally
// take several parameters. Here we allow only enabling or disabling
// of principal component analysis.
//
// Software Guide : EndLatex
// Software Guide : BeginCodeSnippet
auto gradient = GradientMagnitudeFilterType::New();
//gradient->SetUsePrincipleComponents(std::stoi(gradientMode));
gradient->SetUsePrincipleComponents(gradientMode);
// Software Guide : BeginLatex
//
// Finally we set up the watershed filter. There are two parameters.
// \code{Level} controls watershed depth, and \code{Threshold} controls the
// lower thresholding of the input. Both parameters are set as a
// percentage (0.0 - 1.0) of the maximum depth in the input image.
//
// Software Guide : EndLatex
// Software Guide : BeginCodeSnippet
auto watershed = WatershedFilterType::New();
watershed->SetLevel(outputScaleLevel);
watershed->SetThreshold(lowerThreshold);
// Software Guide : EndCodeSnippet
//sag check
// Software Guide : BeginLatex
//
// The output of WatershedImageFilter is an image of unsigned long integer
// labels, where a label denotes membership of a pixel in a particular
// segmented region. This format is not practical for visualization, so
// for the purposes of this example, we will convert it to RGB pixels. RGB
// images have the advantage that they can be saved as a simple png file
// and viewed using any standard image viewer software. The
// \subdoxygen{Functor}{ScalarToRGBPixelFunctor} class is a special
// function object designed to hash a scalar value into an
// \doxygen{RGBPixel}. Plugging this functor into the
// \doxygen{UnaryFunctorImageFilter} creates an image filter which
// converts scalar images to RGB images.
//
// Software Guide : EndLatex
// Software Guide : BeginCodeSnippet
using ColormapFunctorType =
itk::Functor::ScalarToRGBPixelFunctor;
using ColormapFilterType =
itk::UnaryFunctorImageFilter;
auto colormapper = ColormapFilterType::New();
// Software Guide : EndCodeSnippet
// Software Guide : BeginLatex
//
// The filters are connected into a single pipeline, with readers and
// writers at each end.
//
// Software Guide : EndLatex
// Software Guide : BeginCodeSnippet
caster->SetInput(cast->GetOutput());
diffusion->SetInput(caster->GetOutput());
gradient->SetInput(diffusion->GetOutput());
watershed->SetInput(gradient->GetOutput());
colormapper->SetInput(watershed->GetOutput());
using CasterUpdateType = itk::CastImageFilter;
auto castUpdate = CasterUpdateType::New();
castUpdate->SetInput(colormapper->GetOutput());
castUpdate->Update();
try
{
outputImage.Set(castUpdate->GetOutput());
std::cout << "after filter->Update();" << std::endl;
}
catch (const itk::ExceptionObject & e)
{
std::cerr << e << std::endl;
return EXIT_FAILURE;
}
// Software Guide : EndCodeSnippet
return EXIT_SUCCESS;
}
```
i am getting `unexpected pixel type` error.
1. WASI works fine with this code please check see if i am doing anything un-webassembly. for watersheding image.
2. node emscripten, though, is complaling about `unexpected pixel type` which i cannot figure out what is it. I even commented out most of the code except the pipeline part upto the ITK\_WASM\_PARSE(pipeline). Any pixel types above this line could be problematic?
3. by the way i have used itk exasmples to write the warshed segmentation. Median filter for RGB IMAGE is another one of the examples.
> > screen shot of the console in node.js WSL2 ubuntu-22.04 is following
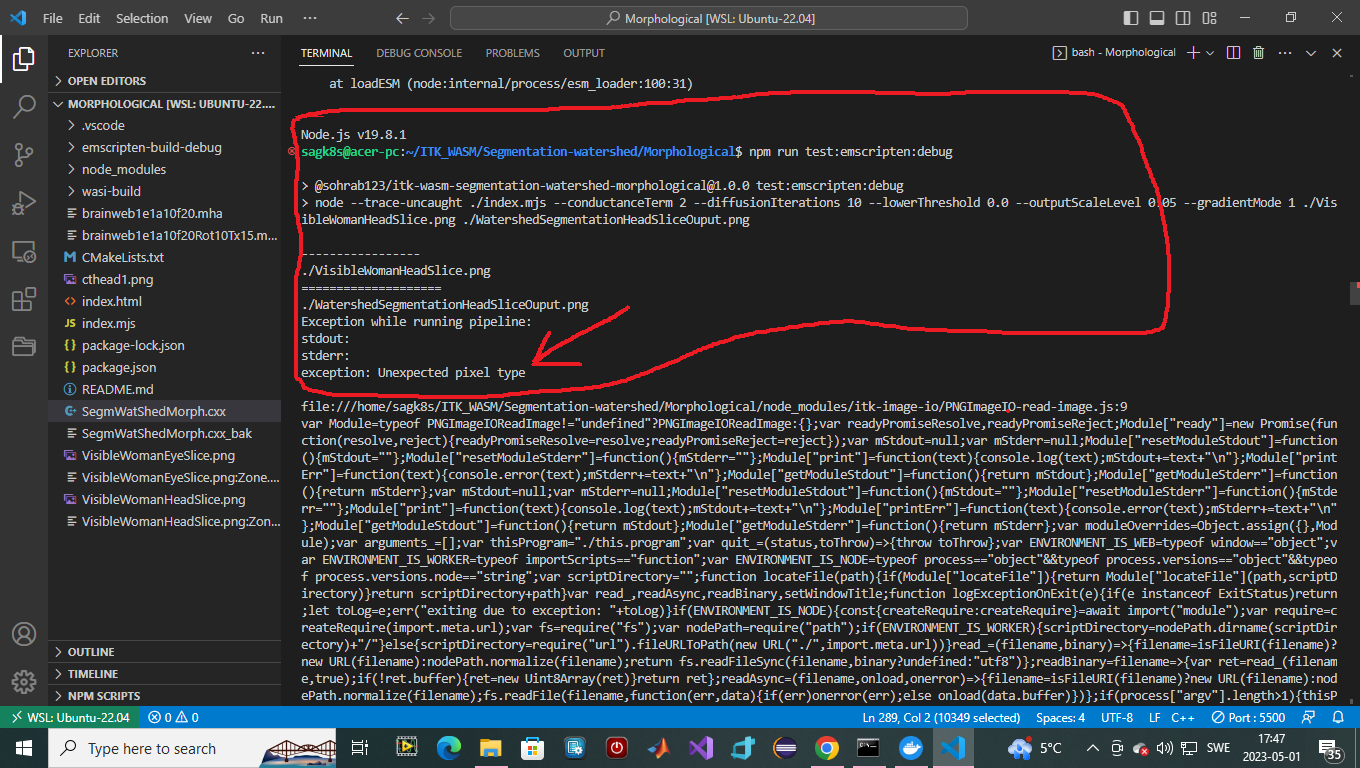
I cannot step into the c++ code though?!
watersheded image WASI

I dont understand how an CT/MRI/radiology/dental/microscope image could be colored?
appreciate the help matt
BR
@sag
---
### Author:  [@matt.mccormick](https://discourse.itk.org/u/matt.mccormick)
#### Post date: [May 1, 2023, 9:17pm UTC](https://discourse.itk.org/t/node-emscripten-for-watershed-segmentation-unexpected-pixel-type/5915/2 "2023-05-01T21:17:55Z")
Hi @sag,
You may want to convert the image to a pixel type supported by your pipeline with [`castImage`](https://github.com/InsightSoftwareConsortium/itk-wasm/blob/c8c6be7bc4261527e7de68c6b28e21be0ce0cdf4/src/core/castImage.ts#L7-L13),
HTH,
Matt